![]()
| Macro photography techniques using the Nikon Coolpix 4500 | ||
| One question we frequently get asked is "what camera do you use for your macro photographs?" Our answer that it is just an old Nikon Coolpix 4500, is usually met with complete surprise, with the questioner expecting equipment costing well over £1,000 pounds for camera body alone, then many more hundreds of pounds for lenses etc. | ||
| ..... | ||
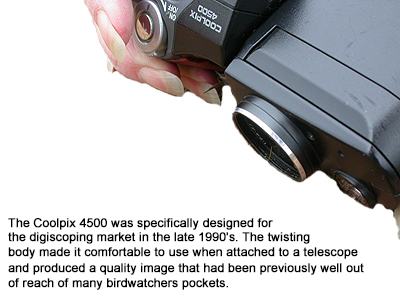
| The truth is, that
spending large sums of money is not really neccessary to
obtain macro images of decent enough quality for use on
the internet or within printed publications. The Coolpix 4500 was specifically designed for the digiscoping market in the late 1990's. The twisting body made it comfortable to use when attached to a telescope and produced a quality image that had been previously well out of reach of many birdwatchers pockets. It did the job well enough, but with gradually lowering prices of DSLR cameras, digiscoping has gradually declined and rare bird images obtained by this method, are now accompanied by the almost apologetic caption "digiscoped record shot". Amazing how quality bird images many could only dream of ten years ago, are perhaps now regarded as something representative of the Polaroid Instamatic camera of the 1970's. Digiscoping never really caught on world-wide as it had in the UK, so Nikon called all its remaining Coolpix 4500 stock back, to sell on the UK market. |
 |
|
| ..... | ||
| We purchased
one of the last brand new cameras a few years ago, for a
third of its original selling price and the only place to
buy one now, is usually from online auction sites, where
they can sell for as little as £30. Despite falling out
of favour with birdwatchers (many had actually still
preferred the 4500's predecessor - the Coolpix 995) as
they upgraded to the more affordable DSLR cameras, their
Coolpix 4500 was boxed and kept in the cupboard. Those
who had also used it for macrophotography like ourselves,
quite often still do to this day and whilst many now use
DSLR cameras for their macrophotography, a number of them
still regard the Coolpix 4500 as being better, whilst it
seems some people never got the desired results from
their emails and comments to us. One downside of the 4500, is its four million pixel capacity. Ten years ago this was pretty much top of the range, yet is easily surpassed now by the camera on many mobile phones. Despite this, we find that the Coolpix 4500 still has some advantages over more expensive DSLR cameras. It generally produces a better depth of field, the twistable camera body makes for easier viewing through the screen in awkward situations and its very tough and durable. Ours have been dropped many times with no ill effects! Two disadvantages of this camera though are the automatic focus, which can be a nightmare when photographing something on a grass stem, when the camera continually focuses on the background and the often slow shutter speed. Basic options and camera settings Before going any further, it is worth quickly mentioning the basic camera settings we use. Having the camera set on Auto mode gives us the best results, but if photographing a white subject against a dark background (avoid if possible, or use a lighter background) then having the camera on Manual mode works better. Use a fairly high ISO setting, as this will improve shutter speed to a degree in low light situations. Image quality is best set to FINE and image size to 1600 x 1200pxls. Images larger than this, will soon fill the memory card that comes with the camera. Have the Flash disabled. |
||
| ..... | ||
| Flash or natural light? | |||
| ..... | |||
| Many macrophotography
subjects are generally difficult to work with. Moths vary
in their photographic cooperation and will be dealt with
later. Beetles are predominantly dark (especially
Carabids) and like most other invertebrate orders, they
move just as the shutter clicks. We never use flash and rely totally on natural light at all times. Although using flash will mean many more usable images, in our view, natural light is considerably better and well worth the number of unusable images. |
 |
 |
|
| ..... | Screenshot A | Screenshot B | |
| ..... | |||
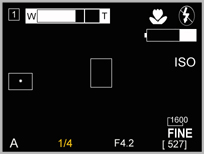
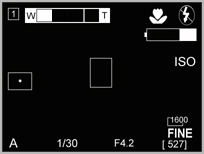
| Of course not using flash inevitably results in a slow shutter speed, but one of the benefits of using natural light is the more accurate colour representation. When working with beetles, the shutter speed is often only 1/4 second (screenshot A). However, certain lighting conditions can also make the subject photographable or not. The combination of clear blue skies and sunshine is not good for many subjects, but good results can come from photographing your subject in the shade. Much better is the 'flat' light produced on a bright, but cloudy day. Morning also tends to produce better light conditions and always be prepared to take a lot of images per subject though, as relying on natural light leads to many images being unusable due to blurring or camera shake etc, especially in low light levels. Whatever the light conditions, always photograph away from the lightest part of the sky for best results. | |||
| ..... | |||
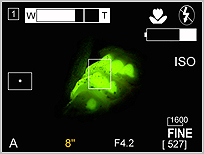 |
The Coolpix 4500 does not work well in late afternoon or evening light, often producing a distinct blue tint to images, no matter how good the light seems. It has worked superbly well in total darkness when we have been photographing female Glow Worms, producing what we regard as some of our best macro images and proving much better than results using DSLR cameras. Photographing Glow Worms with even a small amount of artificial lighting does not produce satisfying, or accurate results. You're working with exposures of 4-8 seconds in light produced solely by a beetle, so some type of support is essential. However, we do not use a tripod. We find the use of a tripod is largely impractical for most macrophotography, especially in the field when the opportunity to photograph the subject is sometimes limited to a few seconds. Use some type of natural support, have the camera resting on a stone or log, in the hand or just on the ground. A bean bag can be very useful for this purpose. | |||
| Screenshot C | ..... | |||
| ... | ||||
| Zoom options and distance from subject | |||
| ..... | |||
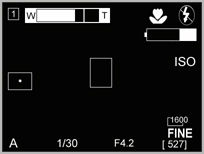
| This combination seems to
be one of the key area s to making the most out of this camera, or where some people seem to struggle. When using the zoom, the Coolpix 4500 only allows focusing on the subject when the zoom bar is somewhere between the two points between wide (W) and telephoto (T) in the camera monitor screenshots D and E. How much to zoom in on the subject depends on the proximity between camera and subject. |
 |
|
|
| ..... | Screenshot D | Screenshot E | |
| ..... | |||
| Whilst it is possible to use a certain amount of zoom and have less than 2.5cm between camera and subject, better results are achieved by having the camera's zoom set as in the above right screenshot and have the camera further away from the subject. It takes time to find what amount of zoom works best with what subject, but it is always better to leave plenty of room (background) around the subject, as images can be cropped to achieve the required results at a later time. Using the camera on a potentially moveable subject in the field, means that familiarity in knowing the amount of zoom to use and at what distance to be from your subject and to know your subjects habits and likely moves, is extremely important. | |||
| ..... | ||||
| Correct exposure and focus options | ||||
| ... | ||||
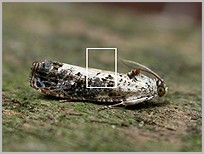
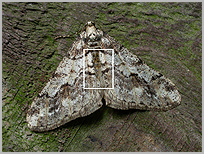
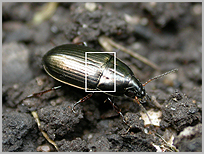
 |
 |
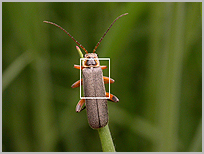
It may seem simple
enough, but the general rule to get the correct exposure
and focus is to aim the centre point of the camera's
field of view on the brightest point on, or immediate to,
the subject. Theses are shown in the accompanying
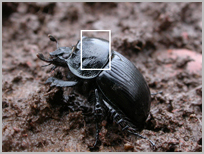
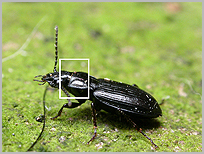
screenshots as a white rectangle. Photographing any dark coloured invertebrate will invariably produce this problem, unless on an almost equally dark substrate or background and getting the camera to automatically set the correct exposure can lead to disappointing results. |
||
| Screenshot F | Screenshot G | ... | ||
| ... | |||||
| Screenshots F and G show two dark subjects on contrasting substrates or backgrounds. All images have been cropped, but we have left in the centre point used when the original images were taken. Sometimes even brightly coloured subjects unexpectedly present the same problem, but in the next screenshots showing the Cardinal Beetle Pyrochroa coccinea, the beetle's colouration and brightness, even when in full sun, was still not brighter than the dead Bracken it was photographed on. |
| ... | |||||
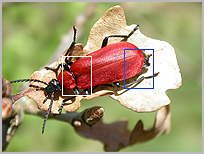
| To get the correct exposure and focus point for both subject and background (screenshot H) the camera was centred just onto the dead Bracken leaf, but at the same time ensured that the subject remained in focus. An incorrectly exposed image of the same beetle is shown in screenshot I. The white rectangle shows the original exposure and focus point used and the blue rectangle shows where the correct exposure and focus point should have been centred. When the subject is moving (even slowly) it is often down to luck to get the exposure and focus correct, so it pays to take as many images as possible or is thought enough. | 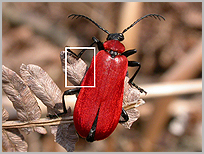 |
 |
|||
| ..... | ..... | ..... | .. | Screenshot H | Screenshot I |
| ..... |
| The Coolpix 4500 does struggle to focus on small subjects on grass blades, twigs or thin stems, as the camera continually focuses on the larger area of background that usually occupies most of the image. Quite often, the safest thing to do (especially if dealing with a rare species) is to pot it up and take it home to try on a different substrate or leaf surface, but an out of focus natural background often completes the image, or at least makes it more interesting. | |||||
| ..... |
| In the field,
a useful technique we employ in this type of situation is
to place a hand or finger immediately behind the subject
and then try focusing again. This usually works well as
once the camera is focused, move the hand or finger out
of shot and providing there is little movement by either
subject or photographer, any additional photographs
should remain in focus. Screenshot K shows the successful
type of result possible using the method described. Wherever possible, we always try to ensure that our photographs are taken whilst out in the field, but this is not always a feasible proposition due to the rarity of a species (and wanting to secure at least one image), being a very active subject, or generally poor lighting or photographic conditions etc. |
 |
||||
| ..... | .. | Screenshot K | |||
| ..... | |||||
| General
photographic techniques using difficult subjects A sensible approach then, is to take the subject home and try again. If photographing moths after an overnight trapping session, then there is no other option but to wait for daylight anyway and micromoths caught during the day, are nearly always best taken home for photographing. A benefit of taking specimens home is that the whole photography process becomes more controllable, even with the more difficult of subjects and in most cases, will ensure more pleasing results. We don't really use photographic set ups as such, often just a few leaves or a patch of bare soil etc, but always try to ensure as natural a background as possible to the resulting image. Patience and persistance are always the key factors needed if useable images are to be obtained anywhere and sometimes results are poor, even if everything looked OK at the time. Don't also think that all of the many excellent images found in books or on the internet, were obtained with just one click of the shutter at the first attempt. Quite often, good results can always be improved on and many of the images we have, were actually taken over the course of several years when further opportunities arose. Photographing outside using natural light, even when at home, always allows the possibility of escape. Yet despite this, there have been only two occasions when we have lost the subject and the opportunity to photograph it, and just one occasion, when we gave up trying to get a photograph after a full day of effort and let it go. Having two specimens of the same species acts as a little security in the event of one escaping. Each subject matter will vary in cooperation. Even different species within a single order (coleoptera, lepidoptera etc) will also vary in how long they will take to settle down, and for long enough to photograph well, so we will try to help you save valuable time and explain the variety of techniques we employ. |
|||||
| ..... | ||||
|
It is well worth having several pieces of small, algae or moss covered wood as a suitable background for moth photography. Thin pieces of latticed fencing are ideal, as they are light to handle, which is a must for working with some of the more active micro moths. Over the years we have found that some micromoths (especially Phyllonorycters) will only settle when held upside down, or on a vertical surface. When ready for photographing, remove the lid off the pot and hold the open part of the pot containing the moth against the wood. Once the moth is still, on the wood and the antennae are held tightly against the body, can the wood then be carefully turned over and placed on a suitable flat surface, the camera readied and in place and the pot lifted gently off. This can take several attempts. Always photograph micromoths from the side if you are going to use your photographs for identification purposes, but it is always better to take shots from all angles, which is vital for many beetles and plantbugs etc. | |||
| ..... | ||
| Most subjects become more lethargic when kept in the fridge for half an hour or overnight, but be warned, as some species cannot tolerate fridge temperatures, even for a short period of time. We have found that it is best not to put many micromoths in the fridge overnight, but to leave them at normal room temperature. The worst micromoths include all adult Nepticulidae, Phyllonorycters, Lyonetiidae and Elachistidae. As a rule, if it's wingspan is only 5-10mm, do not put in the fridge. The more 'robust' micros such as Gelechiidae, Tortricidae and Pyralidae, are generally all fine to be kept in the fridge. Despite being 'chilled' in the fridge, it is surprising how quickly some beetles become active and will make a bid to escape at the first opportunity, but again, many smaller beetles cannot tolerate cool temperatures. Ground beetles (Carabidae) and rove beetles (Staphylinidae) are just about the most difficult of all beetles to obtain good quality images of and give no indication that they are going to move. Most other insect orders are not as bad, though can still be difficult. Small beetles, plantbugs and leafhoppers etc, are all better not cooled in the fridge at all and flies are just easier to photograph in the field. |
| ..... | |||
 |
 |
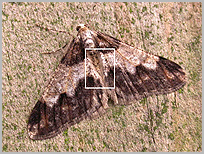
The larger moths are usually fine to photograph and will settle down quite well, but many noctuids immediately start to vibrate their wings as part of the pre-flight warm-up process as soon as they are out of the pot or disturbed. Don't cool them again, but leave them on your chosen substrate in the pot and they should settle down after a few minutes in the shade. Most Geometridae moths are fairly easy to deal with and little trouble, but having a selection of backgrounds available will help stop poor photographic results similar to the example in screenshot M. | |
| Screenshot M | Screenshot N | . | ..... |
| ..... | |||
| Most beetles are considerably more difficult subjects and without taking specimens, many cannot be identified from photographs. Taking many photographs of a live specimen from every possible angle will help to a large degree, but not all crucial identification features will be visible, no matter how good the images turn out. Photographing live beetles in a natural environment is difficult, but extremely rewarding. Many species are best potted up and taken home, cooled down in the fridge and then photographed in an artificial set up. Leaf beetles and weevils are notorious for dropping into grass or leaf litter at the slightest disturbance, so take them home, but some species can be worked with in the field with little trouble. | |||
| ... | |||||
| Very occasionally, it is sometimes well worth photographing some difficult species whilst still in their collecting pots. However, specimens photographed in pots offer no chance of an aesthetically pleasing image. Pot photographs can serve a purpose towards identification, or purely as a record shot, but little else. The Amara ground beetles are a difficult group to ID anyway, but photographing specimens in plastic pots from above will help to narrow the species down, as some of the key identification features needed can be seen by viewing the magnified images on the camera screen. |  |
 |
|||
| ... | ... | Screenshot O | Screenshot P | ||
| ... | |||||
| Noting
features in this way is a useful technique in helping
decide whether more detailed images will be needed to
take the identification further. Two images of the same Amara
aenea are shown in the above screenshots and
although the results differ considerably, the original
image of the beetle in the pot enabled several species to
be ruled out whilst still in the field, whilst the
required image was later obtained on return home. When photographing ground beetles, we believe that a dark background or substrate is beneficial to the resulting image, even though the shutter speed will be lower. The technique we employ is to find a compacted area of soil and keep the pot over the subject until it stops moving, have the camera ready and plenty of patience. Ground beetles and many other species stop moving for only a few seconds at a time, so you have to be quick (but avoid sudden movements) in order to get a decent image. And be prepared to take many images, and from all angles. Compacted soil is better to use as a substrate, as it lessens the chance of losing the subject down the smallest holes or cracks in loose soil. Placing a single leaf on the soil can provide temporary cover for your subject to go under and give you those vital few seconds to get the image you want, when you lift the leaf. This technique is also useful for photographing rove beetles (Staphylinidae) but don't expect to identify many from images alone. Staphs are probably the most difficult beetles of all, only occasionally remaining still long enough to photograph and it can take several attempts and hours, to get just one decent image. Some of the smaller Staphs such as Sepedophilus, Tachyporus and Stenus etc, are certainly easier than most, but on the whole, these still remain a challenging family to photograph. |
|||||
| ... | |||||
| Quite often
these beetles are better photographed when found under
logs. Lifting a log sometimes sees beetles momentarily
freeze, before looking for cover. Certainly if not the
camera, always have a pot ready when lifting any log,
stone or similar. Despite being slow movers, Aphodius dung beetles are quick to become active once out of the fridge. Sometimes blowing on them will stop them moving briefly, allowing suitable images to be obtained. We usually photograph all our Aphodius at home. Other beetles are not so bad and patience is generally rewarded with decent results. However, there will always be exceptions and some species will continue to frustrate for years sometimes. |
 |
||||
| ... | .. | Screenshot R | |||
| ... | |||||
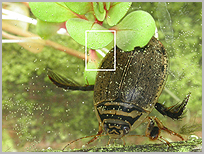
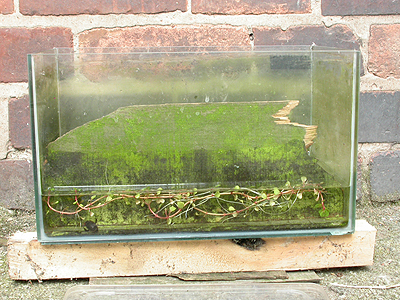 |
Water beetles are another matter and can only really be photographed in a natural looking environment in an artifical set up, especially if natural poses are desired. The set up we use consists of a small 30cm glass tank with a layer of gravel or wood as a substrate and a second piece of wood used as the background. It is better if both gravel and wood are old, or covered with green algae to give a natural feel to the substrate and background. The wood acting as the background is held in place about 3-4cm from the front glass and must fit tightly. Water beetles are very active, so this allows for some movement, yet restricts it. Water to the depth of about 5cm is added and a small amount of pond weed can be put in for effect. The image of Acilius sulcatus in screenshot R, was taken using this type of set up. | ||||
| ... | |||||
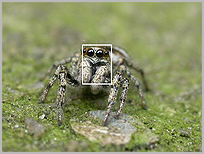
| Spiders are
OK to work with and the jumping spiders (Salticidae)
are a photographers dream and some of the better spiders
to begin with. They are extremely photogenic and almost
curious towards the camera. Having very acute eyesight,
they will continually turn to face any shadow or movement
and perform well. Taking pleasing images of spiders in their webs is usually trouble free, but the auto focus on the Coolpix 4500 will usually mean that it is best to place your hand behind the web, to allow the camera to focus on the subject rather than background. Ground dwelling spiders are best photographed using the same techniques as we outlined for ground beetles. |
 |
||||
| ... | ... | Screenshot S | |||
| ... | |||||
| Taking photographs of other invertebrates are probably best attempted whilst in the field. Flies do not cooperate at all, even when chilled for a time and our best images have all come away from home. Sometimes many subjects are just best attempted when the opportunity arises, as any amount of disturbance will lessen your chances of a decent image. Getting good quality images is all about patience, persistance and a great deal of luck, that eventually comes with experience and knowing the habits of the potential subject matter. | |||||